
Building Your First Seneca.js Application
Tweet
Microservices are on the rise around the world right now, with a recent Microservices Conference in Berlin and new microservice meetups starting to gain popularity. Amazon’s new service AWS Lambda provides scalable infrastructure for small event-driven services. Many languages have their own microservice implementations, including Colossus by Tumblr written in Scala, Apache’s Zookeeper in Java, and a Node.js implementation that I’ve been using called Seneca.js. Recently, I wrote a Beginner’s guide to Seneca.js for newcomers, which walks through the basics of what Seneca.js is and does.
This week, I’m going to walk through the basics of starting a Seneca.js project as the back-end to an Angular.js application. This guide will help get you off the ground for your first Seneca.js application, introduce you to seneca-web for creating HTTP endpoints, and interacting with Seneca’s most fundamental concept, actions. You can read the final source of a Seneca.js application on Github or interact with the live demo.
Boilerplate
For this guide, and for my later projects, I created a Seneca.js Yeoman generator that can quickly scaffold out a boilerplate for a Seneca.js project from the command line. First things first, install the scaffolder yo and the Seneca.js scaffold generator-seneca from npm:
npm install -g yo generator-seneca
Once you have this installed, you can create a new folder for your project (e.g. test-seneca) and run the following command in it:
yo seneca
This will pull in all of your needed dependencies, including Bootstrap for easily styling front-end interfaces, AngularJS, an MVC framework for client side JavaScript applications, Hapi.js as a web server framework, and Protractor for end-to-end functionality testing. The application structure looks like this:
test-seneca
|
|-- client
|   |-- css
|   |-- js
|   |-- partials
|   |-- index.html
|-- server
|   |-- api.js
|-- test
|   |-- functional
|-- bower.json
|-- package.json
|-- server.js
When in the root directory of the project, you can run:
npm start
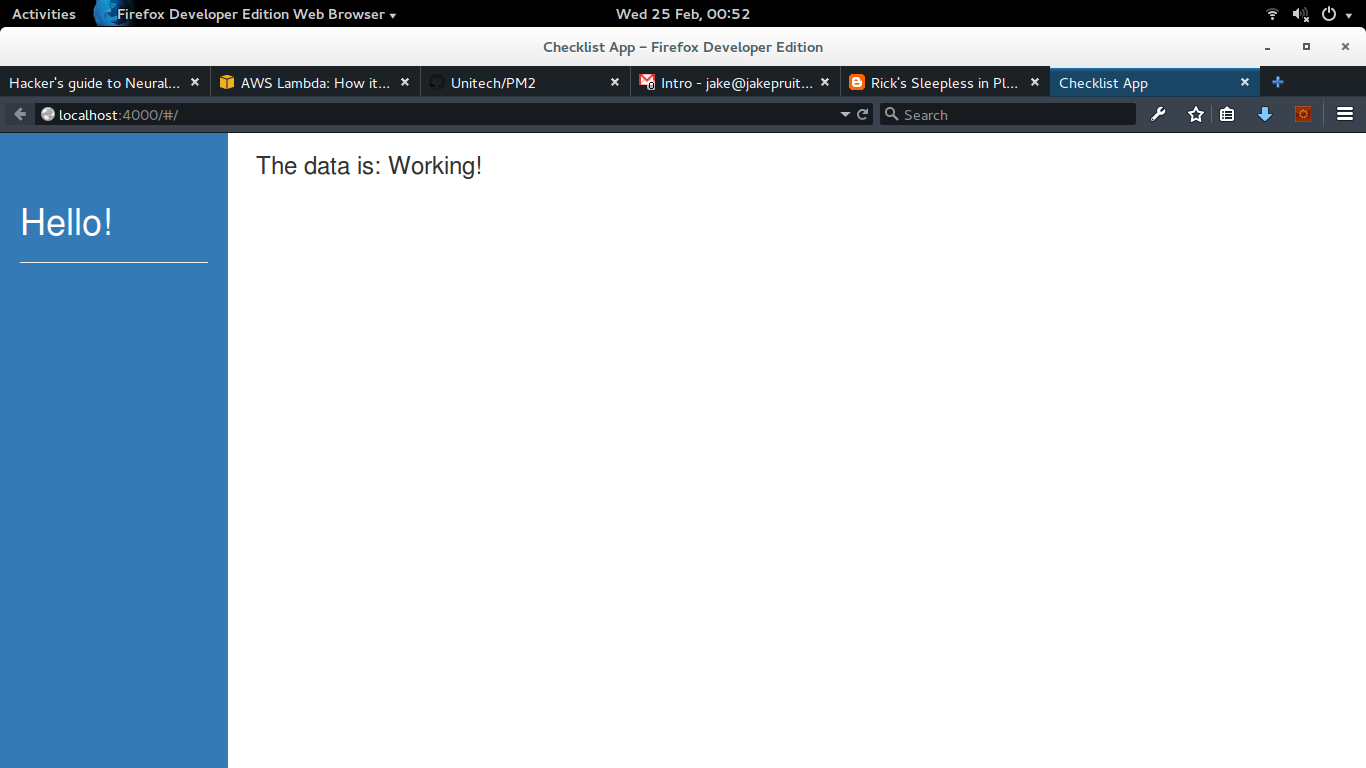
And the Hapi.js server will start running with the single page application on port 4000 and the back-end HTTP API on port 4040. Open your browser to http://localhost:4000/ to see the basic application:
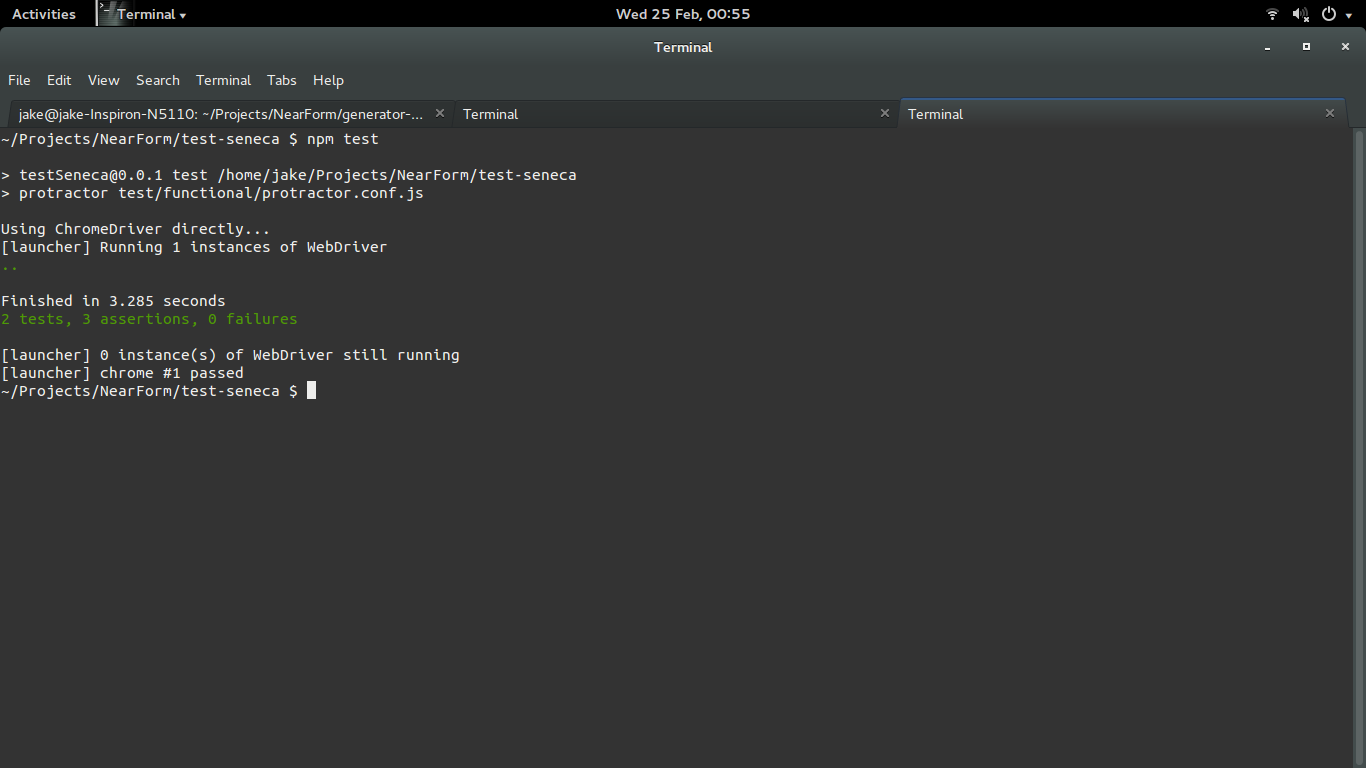
With the server running, open a new tab and run:
npm test
To see protractor perform all of its functional tests on your application:
Creating an API
Now that your application is up and running, you can start building out your API! Open up the file server/api.js and take a look at the current API:
module.exports = function(options) {
  var seneca = this,
      plugin = 'api';

  // Set top-level options for API
  options = seneca.util.deepextend({
    prefix: '/api/'
  });

  // Add all API methods
  seneca.add({ role:plugin, cmd:'test' }, test);

  // Add all necessary routes to REST API
  seneca.act('role: web', { use:{
    prefix: options.prefix,
    pin:{ role:plugin, cmd:'*' },
    map:{
      'test':{ GET:true },
    }
  }});

  function test(args, done) {
    done(null, {working:true});
  }
}
Right now, there is only one action, {role: 'api', cmd: 'test'} and all it does is return the JSON object {working: true} whenever it is called. The method is mapped to the URL /api/test, and when we open http://localhost:4040/api/test the object {working: true} appears.
Now, let’s say you wanted to create a ls command that will read the current directory of the server and return the names of the files. First, you need to add the action to seneca:
seneca.add({ role:plugin, cmd:'ls' }, ls);
Next, define the action, somewhere below the test definition:
function ls(args, done) {
  require('fs').readdir(process.cwd(), function(err, files) {
    if (err) return done(err);

    done(null, {files: files});
  });
}
And then register the action with seneca-web:
seneca.act('role: web', { use:{
  prefix: options.prefix,
  pin:{ role:plugin, cmd:'*' },
  map:{
    'test':{ GET:true },
    'ls':  { GET:true }
  }
}});
Your api.js file should now look like this:
module.exports = function(options) {
  var seneca = this,
      plugin = 'api';
  // Set top-level options for API
  options = seneca.util.deepextend({
    prefix: '/api/'
  });

  // Add all API methods
  seneca.add({ role:plugin, cmd:'test' }, test);
  seneca.add({ role:plugin, cmd:'ls'   }, ls);

  // Add all necessary routes to REST API
  seneca.act('role: web', { use:{
    prefix: options.prefix,
    pin:{ role:plugin, cmd:'*' },
    map:{
      'test':{ GET:true },
      'ls':  { GET:true }
    }
  }});

  function test(args, done) {
    done(null, {working:true});
  }

  function ls(args, done) {
    require('fs').readdir(process.cwd(), function(err, files) {
      if (err) return done(err);

      done(null, {files: files});
      });
    }
  }
};
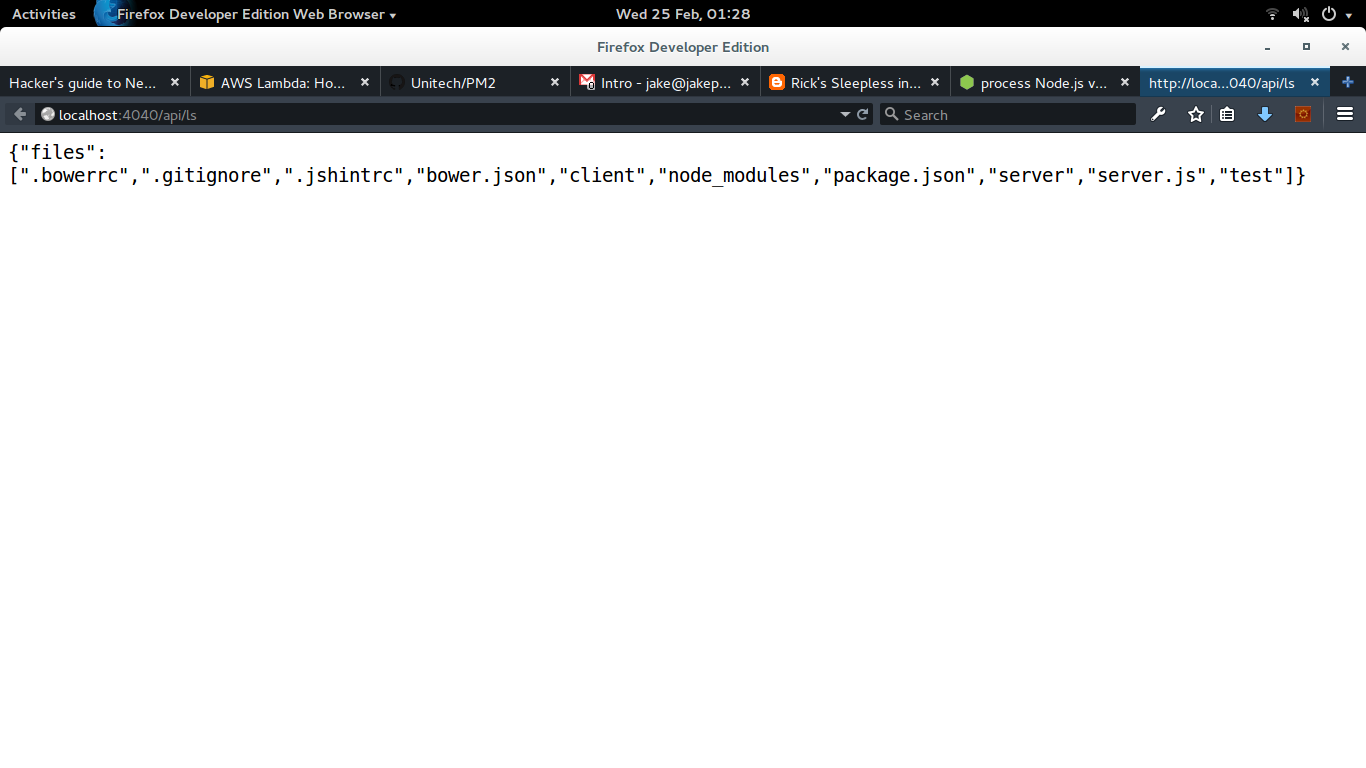
You can now run npm start and open your browser to http://localhost:4040/api/ls to see all of the files in your current directory.
Connecting from AngularJS
Now that you have a working back-end, it’s time to create the necessary components with AngularJS to display the information. In the client folder, you will see all of the files organized according to Todd Motto’s Opinionated AngularJS styleguide for teams, which is my personal favorite when creating an AngularJS app:
client
|-- css
|   |-- app.css
|-- js
|   |-- controllers
|   |   |-- HomeController.js
|   |-- services
|   |   |-- TestService.js
|   |-- app-config.js
|   |-- app.js
|-- partials
|   |-- home.html
|-- index.html
In order to keep resource interaction out of the controller, create a new service, called DirectoryService.js in the services folder. This service will handle all directory operations, for now it will only perform the ls function. In the DirectoryService.js file, create a function that will call /api/ls and return the data.
// DirectoryService.js
'use strict';

function DirectoryService($http) {
  function ls(success) {
    var httpPromise = $http.get('http://localhost:4040/api/ls');·
    return httpPromise.success(success);
  }

  return {
    ls: ls
  };
}

angular
  .module('app')
  .service('DirectoryService', DirectoryService);
Now in the HomeController.js file, we can make a call to DirectoryService.ls() and set the scope variable files to the output of the API call:
'use strict';

function HomeController(TestService, DirectoryService) {
  var home = this;

  home.working = false;
  home.files = [];

  TestService.success(function(data) {
    home.working = data.working;
  });

  DirectoryService.ls(function(data) {
    home.files = data.files;
  });
}

angular
  .module('app')
  .controller('HomeController', HomeController);
And now you have access to the files through the scope variable. In partials/home.html add a repeated list that lists out all of the files received from the server:
<div class="row">
  <div class="masthead bg-primary">
    <div class="page-header">
      <h1 class="site-header">Hello!</h1>
    </div>
  </div>
  <div class="listing row">
    <div class="col-md-12">
      <h3>The data is: <span ng-if="!home.working">NOT </span>Working!</h3>
      <ul>
        <li ng-repeat="file in home.files"></li>
      </ul>
    </div>
  </div>
</div>
And don’t forget to add the /services/DirectoryService.js file to the bottom of index.html! Very easy to forget:
...
<script src="js/services/DirectoryService.js"></script>
...
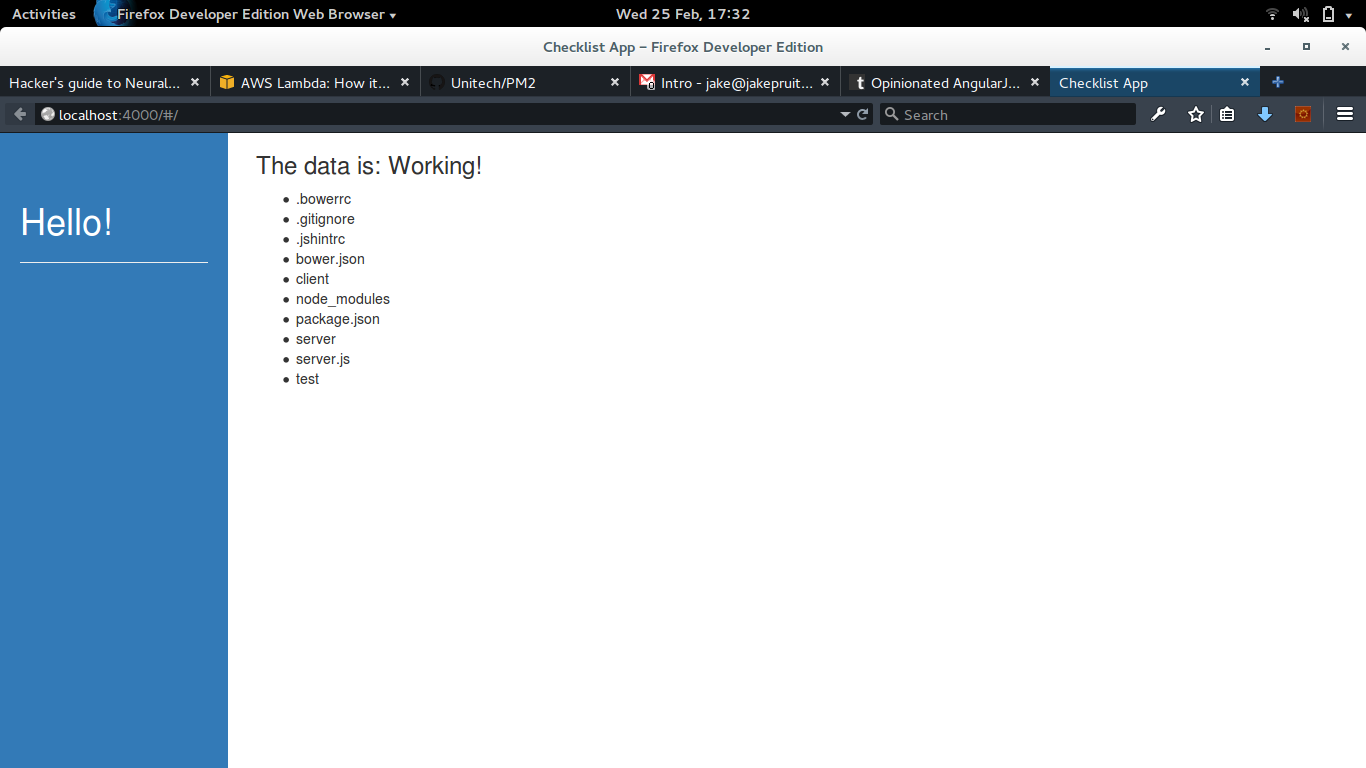
Running npm start and opening http://localhost:4000/ will show you this:
Next Level
Now that you have defined a service and used it from back to front, you can start defining your own actions in api.js and map them to front-end activities! Let me know what kind of questions you have about defining actions for applications. If you want more inspiration, check out my Checklist project on Github.
I am going to be working on the checklist application this week and next week to make it run across multiple processes, and stretch Seneca to its limits. Keep an eye out for future improvements to the generator-seneca scaffolding project. I will be forging ahead with more microservice best practices next week!
Tweet